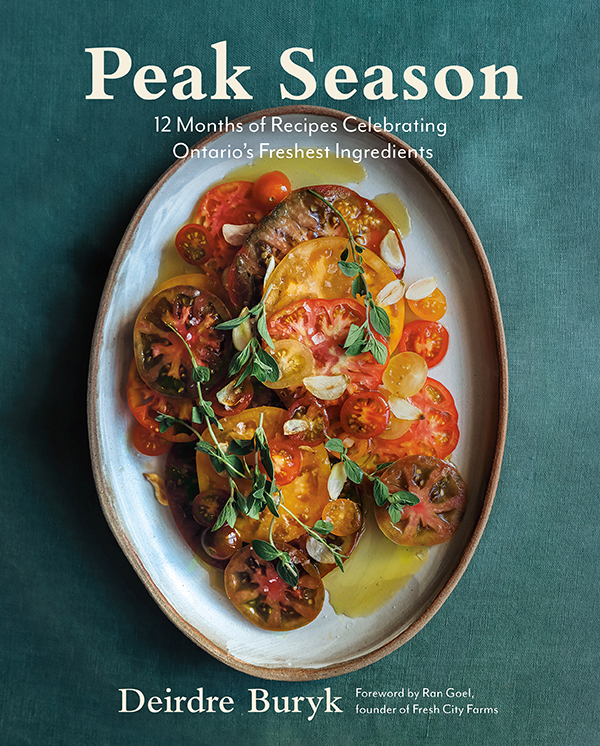
Peak Season: Go Local With These Recipes That Celebrate the Freshest Ingredients

"'Peak Season' is a love letter to the province I grew up in, Ontario, and all the good food that comes out every month of the year,” says recipe creator and local food expert Deirdre Buryk. Photo: © 2021 Janette Downie
“You don’t have to cook fancy or complicated masterpieces – just good food from fresh ingredients” —Julia Child
“Peak Season is a love letter to the province I grew up in, Ontario, and all the good food that comes out every month of the year,” says recipe creator and local food expert Deirdre Buryk.
True to her word, the beautifully photographed cookbook features more than 100 recipes that make the most of seasonal ingredients at the height of their freshness. Think of it as your monthly guide to the province’s peak produce.
Buryk, who started her career as a clinical nutritionist, began writing the book while working in a test kitchen at Toronto’s Fresh City Farms, making organic meals while meeting daily with local farmers. It was from them that she picked up such foodie factoids as to why carrots are sweeter in January than in August. The answer? It has to do with nature’s antifreeze: carrots develop more sugars as the temperature drops in order to avoid freezing underground.
Buryk’s most lasting lesson from this edible education, however, is at the very heart of her book: when cooking with fresh food, you do not have to do too much to it. An apricot in August already is sweet enough.
“Prior to Peak Season, I was on the hunt for a cookbook with simple recipes that celebrate food from my region,” she told Zoomer. “I needed to see beautiful images to inspire me and trust each meal would create a remarkable dish from basic ingredients. I couldn’t find it. So I made it.”
If you’d like to sample some of her culinary creations, we serve up some recipes from the book. But first, some cooking and entertaining tips from Buryk.
Insider Tips: Can you share your favourite flavour boosters — and any other secret weapons?
Pickled vegetables. Pickled onions on tacos, pickled carrots in salad or pickled radishes for bagels and crème fraîche. The acidity of a pickled vegetable adds brightness and an extra zing to any dish. You can quickly pickle almost anything, store it in your fridge for up to two weeks, and make a boring meal or leftovers into something to write home about.
Easy Entertaining: What is your go-to dish for cooking/entertaining without the stress?
I like to have a few no-stress recipe templates that I can adjust the ingredients depending on what is in peak season that month. An apple galette in November will become a peach galette in August. I like to add a little ice cream in the summer or marscapone in the winter. If it is dinner, you cannot go wrong with a simple pasta. In the winter, oyster mushrooms on linguine with tarragon butter, or in the summer a bowl of spaghetti in a white wine marinara, fresh cherry tomatoes and basil from the garden topped with parmesan shavings. Nothing crazy. Serve it with a salad of torn greens, some vinegar and oil, salt, and maybe a seasonal vegetable or two. These are simple meals to make — and with few dishes to clean later.
Must – Haves: What items/ingredients do you keep stocked in your pantry/fridge?
Here’s what I always have on hand:
- A good quality olive oil for salads and finishing
- A cheaper extra virgin olive oil for cooking
- Plenty of different vinegars for pickling
- Kosher salt for cooking, I like Diamond Crystal for consistency
- Flaky salt for finishing
- Dried lentils and heirloom beans for apocalypse emergencies
- Lemons (not seasonal but an exception because they are portable acidity and the zest is a magic meal enhancer)
- Cucumbers in the summer
- Squash in the winter
- A freezer full of berries I picked last summer (Saskatoon, mulberries, raspberries and blueberries)
- Broths or bones in the freezer — there is no better substitute but if I must, Better Than Bouillon for lazy nights
- Garlic and onions. Whenever I was in my test kitchen and I needed to summon a coworker, I would cook with garlic and onions — that aroma never fails
- Parmigiano Reggiano. No explanation necessary
- Eggs
- Fresh herb garden. Even in the winter, I will have fresh herbs
- Flour for baking
- Whole spices — the flavour is freshest this way … On that note, I always cook with a microplane, a sharp chef knife, a cast iron and a big old cutting board in my kitchen
Finding Comfort: What is your go-to comfort food dish?
Porridge. For me, it is a warm, welcoming bowl of nostalgia and good use of one of Canada’s favourite cereal grains. Growing up, I would visit my aunts and uncles back in Ireland. They made sure, even at age five, I knew how to cook a quality bowl of porridge. Smooth but not watery. A little chew to it but not so thick it could replace a brick. When done right, porridge becomes a canvas to add whatever textures or flavours one may fancy. In the winter, this might mean cardamom pears roasted until they caramelize, along with a crunch of hazelnuts or almonds. In the summer, fresh berries are artfully arranged into my porridge with extra milk or yogurt to cool down the bowl and make every spoonful feel like velvet.
Snack Attack: What is your favourite snack?
My commitment to a sensible snack shows no boundaries, and nature has a fine way of making things easy to take on the go. That is why an apple in October, a carrot dipped in almond butter and flaky sea salt in January or a cucumber, eaten like a wand, in July. All they need is a good washing before packing up and heading out for the day.
Multigenerational: Favourite dishes to cook with the kids or grandkids?
My absolute favourite dish is the one I cook with my four-year-old nephew, Theo. Every so often he will come to visit just to cook with me. He likes cracking eggs and mixing dough so we tend to make a lot of dutch babies together. I have a dutch baby recipe in my cookbook (recipe below) that we have made together with stewed rosemary blueberries. He loves blueberries, especially in August. He is also a big fan of eating cucumber wands with me.
This Q&A has been edited and condensed.
RECIPES
Dutch Baby With Stewed Rosemary Blueberries
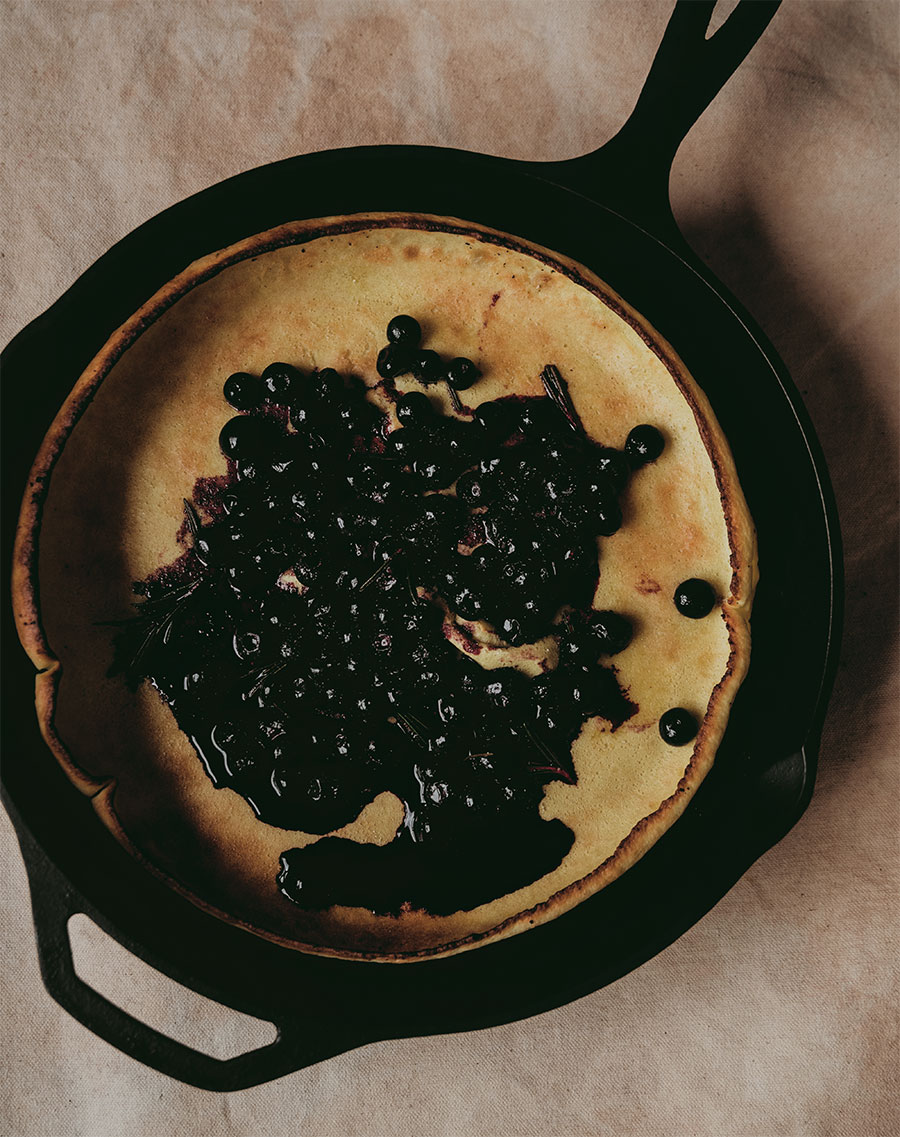
Native to Ontario in their wild form, blueberries are teeny little gems with plenty of amusement for the palate. When markets are packed with blueberry stalls from July through to August, you have plenty of opportunity to try a delicately sweet true-to-Ontario fruit. If you look closely, you will notice a silver coating on a blueberry — that is there to protect them, so wash only when you are ready to eat them. Though they are quite spirited on their own, a little rosemary can heighten the flavours of the blueberry with its lemon-pine pungency, making for two nice partners, especially when served on a puffy Dutch baby pancake.
Serves 4
Ingredients:
Stewed Rosemary Blueberries
1 cup blueberries
1 tablespoon water
1 tablespoon granulated sugar 1 sprig rosemary (or 1 teaspoon dried)
Dutch Baby
½ cup (65 grams) all-purpose flour
½ cup (125 mL) oat milk (or any milk)
3 eggs
2 tablespoons granulated sugar
½ teaspoon kosher salt
2 tablespoons (30 grams) unsalted butter, room temperature
Directions:
1. In a medium skillet over medium-high, heat the blueberries and water. Once the liquid begins to form little bubbles, reduce the heat to medium-low and add the sugar and rosemary. Stir and stew until the sugar has dissolved, 2 minutes. Remove from the heat and set the stewed rosemary blueberries aside, removing any woody stems of rosemary.
2. In a blender or food processor fitted with the blade attachment, place the flour, milk, eggs, sugar, and salt. Blend for 10 seconds, scrape down the sides, and then blend for another 10 seconds. The batter will be quite loose (like a liquid). Allow the batter to rest in the blender for 20 to 25 minutes. This will give the flour a chance to absorb the liquid and the batter to thicken.
3. Meanwhile, preheat the oven to 425 F (220 C). Place a 12-inch (30 cm) oven-safe skillet in the oven to warm along with the oven. When the batter has finished resting, remove the skillet from the oven (remember, it will be hot, so use oven mitts). Add the butter and swirl the pan to melt the butter and coat the bottom and sides of the pan. Pour the batter into the butter-coated skillet and tilt the pan to spread the batter evenly across all sides of the skillet.
4. Bake until the Dutch baby has puffed into a golden cloud with darker brown, crispy edges, 15 to 20 minutes. Serve hot from the pan and top with your stewed rosemary blueberries.
Soft Baked Eggplant With Crispy Millet, Calabrese Peppers & Honey-Almond Drizzle
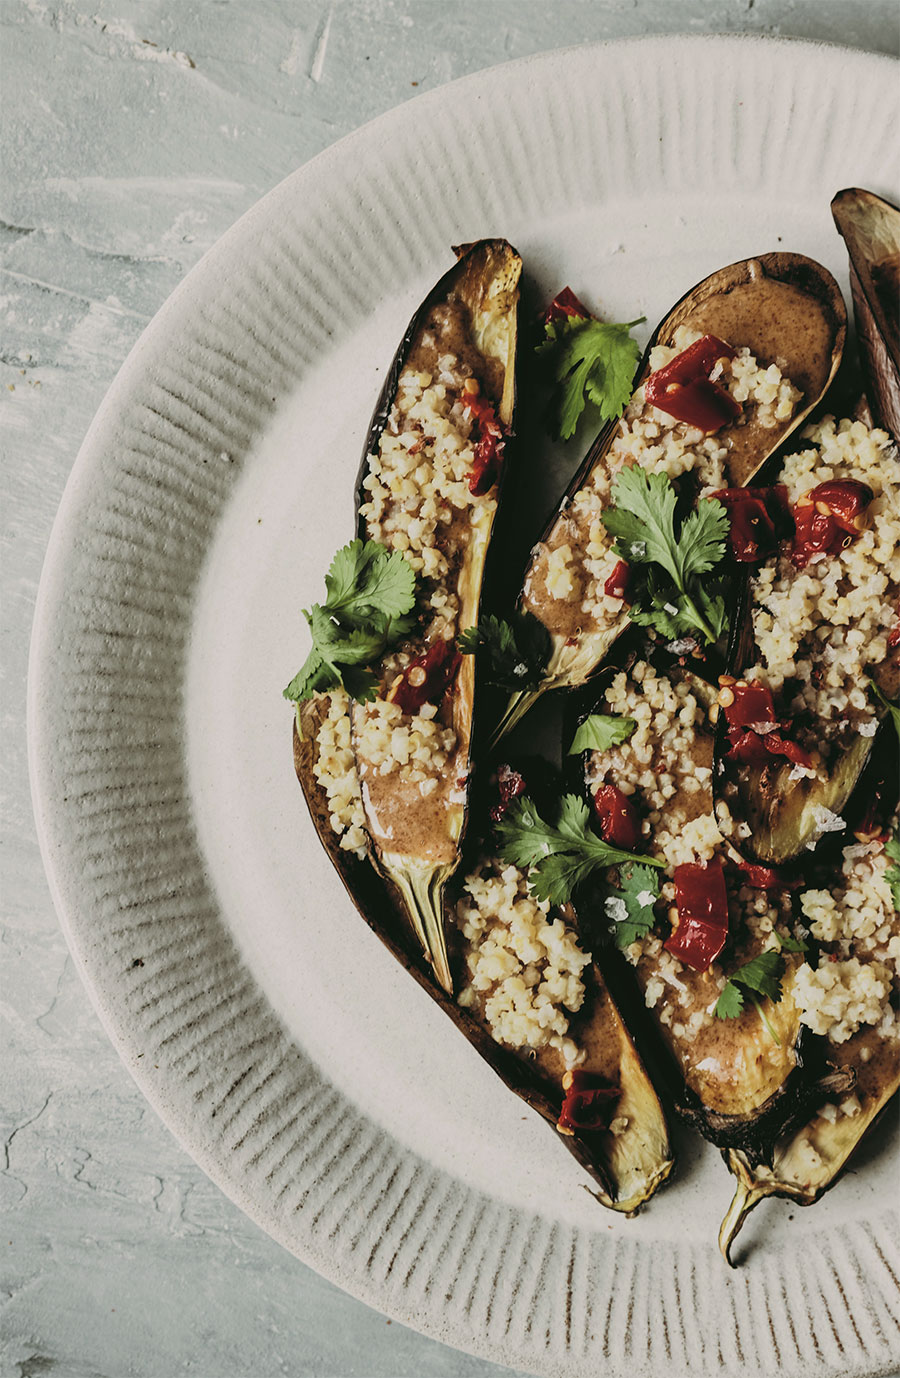
So many types of eggplant varieties are available in September, and I highly recommend playing around with the different shapes and sizes you come across. I love the striped look of graffiti eggplants, the long, thin Japanese eggplants, and, of course, the large meaty globe variety. The last is the most commonly available, and it works in this recipe when serving a few extra-hungry folks; you will just need to slice it a few extra times for accurate cook time. Using a few different types of eggplant can make for a beauti- ful presentation, and all types, once roasted, are a fine match for the sweet and nutty honey-almond drizzle, the spicy kick of the Calabrese peppers, and the fresh citrus zings of parsley and sumac. Millet adds a nice chew and a bit of sustenance, making this a hardy lunch or a substantial side.
Serves 4
Ingredients:
1½ cups (375 mL) water
½ cup millet, rinsed (see Note) 2 cloves garlic, minced
Flaky sea salt, to season
1 tablespoon honey (see Note)
2 tablespoons good-quality extra virgin olive oil, plus 1 teaspoon to coat baking sheet
4 tablespoons almond butter
4 small (Japanese, graffiti, or fairy tale) or 2 medium (globe) eggplants
½ cup roughly chopped Calabrese peppers in oil (see Notes)
1 teaspoon ground sumac
¼ cup flat-leaf parsley leaves, roughly torn
Directions:
1. In a small pot over high, bring the water to a boil. Reduce the heat to medium-low. Add the millet and garlic to the boiling water.
2. Simmer until the millet is fluffy and fully cooked, 20 to 25 minutes. Remove the pot from the heat and fluff the millet with a fork.
3. Season with salt and set aside.
4, In a small mixing bowl, whisk together the honey, 2 tablespoons olive oil, and almond butter. Season with salt.
5. Preheat the oven to 375 F (190 C) and lightly coat the baking sheet with the remaining teaspoon of olive oil.
6. If using small eggplants, cut them in half. If using larger eggplants, slice them into ½-inch (1 cm) pieces lengthwise. Score the flesh of the eggplant diagonally four to five times. Season with salt and set aside to rest while the oven preheats. Place the eggplants, cut side up, on the prepared baking sheet. Bake until fork-tender, 15 to 20 minutes (if using small eggplants) or 25 to 30 minutes (if using medium eggplants). Set aside on a serving plate to cool, but keep the oven on.
7. Once the eggplants are cooled, spread the almond drizzle across each slice. Evenly divide the cooked millet across each slice and top with a sprinkling of Calabrese peppers, ground sumac, and parsley.
Notes: Millet is a tiny, gluten-free grain from the grass family. It is quick to cook and very nutritious, especially compared with the other major cereals, like wheat and rice. The most common type grown in Ontario is proso millet — nutty with a similar fluffy texture to perfectly steamed rice.
I recommend picking a local honey instead of your standard super-store honey. Local honey helps improve seasonal allergies and is often fresher than the latter. I use a wildflower honey from a friend, Irina from Bees Universe.
Different honeys will change this dish slightly, but it is really up to you if you’d like to add a hint of floral, fruit, or earth to your dish.
You can find Italian Calabrese peppers in oil at most Italian grocery shops and at some superstores. If you can’t find them, I recommend using oil-soaked roasted red peppers with ½ tea- spoon dried chili flakes instead.
Arctic Char With Garlic Scape Pesto
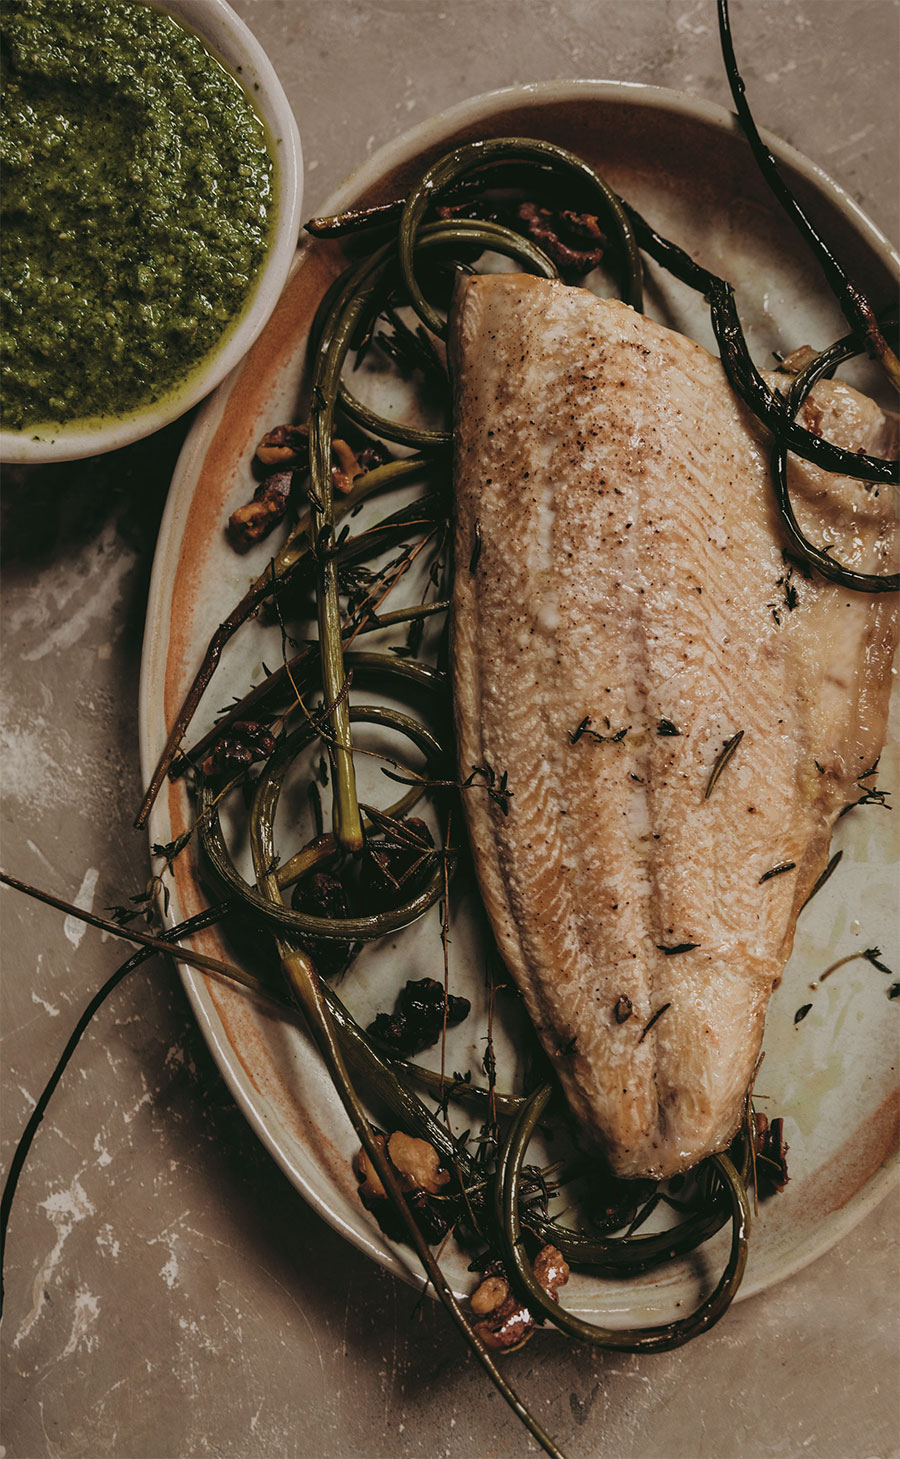
Of all the fast suppers, fish is what I turn to most. Begin with a mild fish like Arctic char — much less fishy than salmon despite looking similar — and pair with a pungent sauce. This pesto is made mostly of garlic scapes — a spirally green stalk divorced from its own (garlic) bulb. Scapes are innately garlicky in flavour, so there is not much else to add. I like to whiz in a few leafy greens, some walnuts, and a delicate oil. With few ingredients, some more eccentric than others, this pesto is a bit different, yet famil- iar—a quality I like to have in my cooking.
Serves 4
Ingredients:
Garlic Scape Pesto
8 large garlic scapes, woody bulbs removed and the remainder cut into ½-inch (1 cm) pieces
1 cup sorrel (or arugula)
½ teaspoon kosher salt, plus more to season
¾ cup (180 mL) walnut oil (see Note)
¼ cup (60 mL) white wine vinegar
½ cup raw walnuts
Arctic Char
1 Arctic char fillet (1 pound/450 grams)
Kosher salt and freshly cracked black pepper
A few sprigs fresh thyme
A few sprigs fresh rosemary
4 garlic scapes, fully intact
1 handful raw walnuts, for garnish (optional)
Good-quality extra virgin olive oil, for drizzling
Make the Garlic Scape Pesto:
1. Set a large pot of water with a steam insert over high heat. Let the water boil, then add the garlic scapes to the steamer and blanch for 2 minutes. Remove and rinse in cool water (see Note).
2. Place the blanched scapes in a food processor and add the sorrel and salt. Process while slowly adding the walnut oil and then the vinegar. If the pesto begins to gather at the edges, turn off the processor and use a rubber spatula to scrape down the sides, then continue processing. Once a chunky paste has formed, add the walnuts. Pulse the processor until the nuts are completely chopped and a coarse paste has formed. A little texture is a good thing here.
Prepare the Arctic Char:
1. Season the Arctic char with salt and pepper. Set in the refrigerator for a minimum of 20 minutes. Preheat the oven to 425 F (220 C) and line a baking sheet with parchment paper.
2. Place the seasoned char on the prepared sheet. Scatter the thyme and rosemary sprigs, garlic scapes, and walnuts around the fish. Drizzle lightly with oil. Roast until the fish has cooked through and reaches an internal temperature of 145 F (63 C) on an instant-read thermometer, about 20 minutes.
3. Plate the fish with the herbs and scapes directly from the baking sheet, and garnish with walnuts. Set aside to cool for 5 minutes before serving with the pesto.
Notes: Grown in Canada, walnuts add a beautiful delicate flavour to this dish. Walnut oil is an uncommon pantry ingredient and can be expensive. If you do not have walnut oil on hand, a good olive oil for dressing is your second-best friend.
I recommend blanching the scapes prior to processing, to cut the sharpness of the raw garlic taste while keeping the flavour intact.
Apricot BBQ Sticky Ribs

The popularity and excellent PR of an August peach has cast a shadow on the poor apricot, which makes me believe that apricots are the most underrated fruit of Ontario. Not only wonderful eaten fresh from the market but in a sticky barbecue sauce, an apricot will bring out the best of these grilled rib’s smoky flavours (which may have gone barely noticed otherwise). Always, always, always pick a good-quality meat; your ribs will be as good as the farm the animals were raised on. I like to serve my ribs with a side of potatoes made however my guests like them (you could go with the Crispy Smashed Potatoes on page 50 or the Crispy Homemade Fries on page 256). If you have time, marinate these ribs 1 day ahead of grilling — that 24 hours will make them even better.
Serves 6
Ingredients:
4 pounds (1.8 kilograms) beef back ribs
Kosher salt, to season
Sticky Apricot BBQ Sauce
4 ripe apricots, stoned and roughly chopped
½ cup (125 mL) extra virgin olive oil
¼ cup (60 mL) canola oil
2 cloves garlic, minced
¼ cup (60 mL) honey
3 tablespoons Dijon mustard
3 tablespoons balsamic vinegar
½ teaspoon kosher salt
Freshly cracked black pepper, to season
Directions:
1. Season the ribs with salt and place evenly across a shallow baking dish.
2. Place the apricots, olive and canola oils, garlic, honey, mustard, balsamic vinegar, salt, and pepper into a blender and blend on high until a smooth sauce has formed. Pour the sauce over the ribs in the baking dish. Cover the dish and marinate the ribs for 6 to 24 hours in the refrigerator.
3. Preheat a well-oiled grill to 250 F (120 C). Wipe excess marinade off the ribs. Close the grill and cook the ribs for 1 hour and 20 min- utes, flipping every 20 minutes (and with an internal temperature of 160 F/71 C; see Note). Transfer the ribs to a cutting board, tent with foil, and let rest for 5 minutes before serving.
Note: The only accurate way to check when your ribs are done is checking their internal temperature with an instant-read thermometer. Ribs are safe to eat at any point after 160 F (71 C) but will be fall-off- the-bone at 190 F (88 C).
Excerpted from Peak Season by Deirdre Buryk. Copyright 2022 Deirdre Buryk. Photography © 2021 Janette Downie. Published by Appetite by Random House, a division of Penguin Random House Canada Limited. Reproduced by arrangement with the Publisher. All rights reserved.
Peak Season: 12 Months of Recipes Celebrating Ontario’s Freshest Ingredients will be released on May 17, 2022.
RELATED:
Chef Suzanne Barr Shares Two Afro-Caribbean Inspired Recipes: 100K Curry Chicken and Rosemary Socca
‘Spontaneity and Joy’ in the Kitchen: 4 Easy Recipes From Celeb Chef Devin Connell
'%3E %3Cg id='Group'%3E %3Cpath id='Vector_2' d='M12.4876 13.8996V13.4213H0.743091V15.2149H9.18805L9.22196 15.2685C9.19653 15.2272 3.24373 25.2836 0.74521 29.5469C0.420975 30.1015 0.0797856 30.7158 0.0797856 30.7158C0.0713089 30.7323 0.0585938 30.755 0.0585938 30.755H12.1401V28.9614H3.67181L3.6379 28.9078C3.37512 29.1222 12.4876 13.8996 12.4876 13.8996ZM36.1229 22.115C36.1229 26.4896 33.7537 29.18 31.1683 29.18C28.5829 29.18 26.1861 26.4896 26.1861 22.115C26.1861 17.7403 28.5553 15.0231 31.1683 15.0231C33.7812 15.0231 36.1229 17.7403 36.1229 22.115ZM22.0155 22.115C22.0155 26.4896 19.6462 29.18 17.0587 29.18C14.4712 29.18 12.0765 26.4896 12.0765 22.115C12.0765 17.7403 14.4458 15.0231 17.0587 15.0231C19.6717 15.0231 22.0155 17.7403 22.0155 22.115ZM38.223 22.0613C38.223 16.7095 35.0443 13.1492 31.1661 13.1492C27.288 13.1492 24.3402 16.4312 24.0987 21.4326C23.8592 16.4333 20.7842 13.1492 17.0587 13.1492C13.3332 13.1492 9.97427 16.7074 9.97427 22.0613C9.97427 27.4153 13.1785 31.0003 17.0587 31.0003C20.9389 31.0003 23.8592 27.7183 24.0987 22.6922C24.3402 27.7162 27.4406 31.0003 31.1661 31.0003C34.8917 31.0003 38.223 27.4421 38.223 22.0613ZM51.3747 30.755H53.5257L52.3178 13.4213H50.1668L45.797 27.3328L41.4273 13.4213H39.2763L38.0662 30.755H40.2172L41.0352 19.0247L44.7205 30.755H46.8714L50.5567 19.0247L51.3747 30.755ZM53.9453 30.755H62.3797V28.9614H56.0963V22.9293H60.964V21.1357H56.0963V15.2128H61.8859V13.4192H53.9453V30.7529V30.755ZM69.3624 18.2021C69.3624 20.1029 68.1333 21.1625 66.7367 21.1625H64.893V15.2128H66.7092C68.1333 15.2128 69.3624 16.3261 69.3624 18.2021ZM71.5134 18.1753C71.5134 15.2128 69.3348 13.4213 67.0164 13.4213H62.7993V30.755H64.893V22.9313H66.7092L71.5112 30.755H73.997L68.8601 22.4695C70.369 21.8717 71.5134 20.3502 71.5134 18.1773' fill='%23231F20'/%3E %3C/g%3E %3C/g%3E %3C/g%3E %3Cg id='Group_2'%3E %3Cpath id='Vector_3' d='M9.67285 8.56629V3.50513H12.6249V4.11535H10.5947V5.71719H12.2943V6.32742H10.5947V7.954H12.9046V8.56423H9.67285V8.56629Z' fill='%23231F20'/%3E %3Cpath id='Vector_4' d='M17.6819 8.6137H17.2581L15.1855 3.50513H16.1392L17.0822 5.86975C17.2178 6.20991 17.362 6.63872 17.4976 7.05103H17.5188C17.6544 6.64696 17.7879 6.2264 17.9341 5.86975L18.8666 3.50513H19.7482L17.6862 8.6137H17.6819Z' fill='%23231F20'/%3E %3Cpath id='Vector_5' d='M22.4072 8.56629V3.50513H25.3593V4.11535H23.3291V5.71719H25.0287V6.32742H23.3291V7.954H25.639V8.56423H22.4072V8.56629Z' fill='%23231F20'/%3E %3Cpath id='Vector_6' d='M31.6164 8.56629L29.9698 6.32123H29.2959V8.56629H28.374V3.50513H30.0948C30.9552 3.50513 31.805 4.01227 31.805 4.90906C31.805 5.54402 31.3896 5.97283 30.8725 6.16249L32.6654 8.56629H31.6185H31.6164ZM29.9592 4.10711H29.2959V5.71719H29.9592C30.436 5.71719 30.8704 5.43888 30.8704 4.90906C30.8704 4.37923 30.436 4.10711 29.9592 4.10711Z' fill='%23231F20'/%3E %3Cpath id='Vector_7' d='M37.5849 6.27382V8.56629H36.6737V6.28206L34.6943 3.50513H35.667L36.6503 4.90081C36.8156 5.13789 37.0021 5.38528 37.1378 5.59968H37.159C37.3031 5.39353 37.5001 5.11522 37.657 4.90081L38.6403 3.50513H39.5621L37.5828 6.27382H37.5849Z' fill='%23231F20'/%3E %3Cpath id='Vector_8' d='M44.3084 4.11535V8.56629H43.376V4.11535H41.7188V3.50513H45.9656V4.11535H44.3084Z' fill='%23231F20'/%3E %3Cpath id='Vector_9' d='M52.0484 8.56629V6.32948H49.499V8.56629H48.5771V3.50513H49.499V5.71926H52.0484V3.50513H52.9808V8.56629H52.0484Z' fill='%23231F20'/%3E %3Cpath id='Vector_10' d='M56.2129 8.56629V3.50513H57.1453V8.56629H56.2129Z' fill='%23231F20'/%3E %3Cpath id='Vector_11' d='M64.7402 8.64463L62.4091 6.17693C62.0467 5.79553 61.6208 5.31106 61.2796 4.91524L61.2584 4.92349C61.2796 5.3523 61.2902 5.7811 61.2902 6.13776V8.56629H60.3789V3.50513H61.0316L63.1868 5.82233C63.4878 6.14806 63.9222 6.63872 64.2337 7.00362L64.2549 6.99537C64.2337 6.62223 64.2231 6.17899 64.2231 5.83677V3.50513H65.1344V8.64669H64.7402V8.64463Z' fill='%23231F20'/%3E %3Cpath id='Vector_12' d='M70.9048 8.64416C69.4235 8.64416 68.0566 7.69172 68.0566 6.03421C68.0566 4.37671 69.4659 3.41602 70.8752 3.41602C71.5999 3.41602 72.17 3.57476 72.5324 3.78091L72.3883 4.42412C72.0471 4.21797 71.5491 4.05098 71.0002 4.05098C69.9639 4.05098 68.9912 4.77253 68.9912 6.04246C68.9912 7.31239 69.9448 8.01745 70.9599 8.01745C71.405 8.01745 71.7567 7.93911 71.975 7.7948V6.61352H70.8349V6.03421H72.8354V8.12877C72.3586 8.47718 71.7271 8.64416 70.9091 8.64416H70.9048Z' fill='%23231F20'/%3E %3C/g%3E %3Cpath id='Vector_13' d='M0.0839844 1.00212L73.997 1' stroke='%23231F20' stroke-width='1.25' stroke-miterlimit='10'/%3E %3Cpath id='Vector_14' d='M0.0839844 10.9116H73.997' stroke='%23231F20' stroke-width='1.25' stroke-miterlimit='10'/%3E %3Cpath id='Vector_15' d='M4.91016 4.15649L3.55812 4.13794L5.18777 5.7068L0 5.6532V6.5974L5.20049 6.651L3.61321 8.18068L4.96526 8.19718L7.0018 6.20157L4.91016 4.15649Z' fill='%23D71920'/%3E %3C/g%3E %3C/svg%3E)
