
Take the pressure off the sit-up with new and improved ways to strengthen your core.
As we move through life, our fitness regimens change. The dreaded mile run from gym class turned into an occasional pick-up hockey game in our 20s, which morphed into coaching peewee soccer in our 30s (walking and shouting at kids is exercise, isn’t it?). Then middle age came and continues and, well, many of us just got tired. And that’s a lame excuse. Anything we can do to limber up will only help as we grow older. But just how to begin?
The old standby for many is the traditional sit-up, that go-to for
abdominal muscles. But studies have shown it may not be your best fitness friend after all.
Dr. Stuart McGill, professor emeritus of spine biomechanics at the University of Waterloo and author of Back Mechanic, who studied the sit-up’s effect on the spine, says choosing an appropriate exercise comes down to its risks and rewards.
In his extensive study of the exercise, he determined that the average person generated more than 300 kilograms of compressive load on their flexed spine with a sit-up. That’s equal to the exposure limit for low-back compression set by the National Institute for Occupational Safety and Health. The combination of the repeated bending motion, together with the compressive load from the muscle activity, can lead to disc bulging and herniation.
That potential for injury is greater for those performing the exercise with extreme repetition. Such was the case for the Canadian Armed Forces, who – after consulting with McGill and other experts – dropped the sit-up from their fitness testing in favour of safer and more effective exercises that better simulated real-world tasks.
While the average Canadian doesn’t exercise with the same vigour as Canada’s military hopefuls, the sit-up can exacerbate pre-existing back pain caused by conditions like arthritis. “When you keep bending an arthritic spine, it becomes sensitized and painful,” McGill says.
As for the rewards, people have traditionally believed the sit-up targets the abdominal wall, which appears as the coveted six-pack when it’s strengthened and layers of fat are shed from the abdomen. But it’s also a crucial part of our core musculature, which serves a far more important function.
“Having a fitter core always makes sure you have that resilience in your spine to execute when you need it –whether it’s arresting a fall, getting out of the way of a car if you stepped off the curb, carrying your groceries or your grandchild.”
Hinging up over the hips during a sit-up also strengthens the hip flexors, muscles that help us get our foot out in front of us when we stumble.
Fortunately, McGill has identified a way to replicate these benefits while minimizing the risk. After putting a variety of core exercises through the same stringent analysis as the sit-up, he identified the big three: a trio of core exercises that he says are “the very best in sparing the spine, ensuring sufficient spine stability and creating sufficient athleticism.”
“You’re not training to be a Navy Seal anymore,” McGill says of switching from the sit-up to the big three. “You’re training to be the most pain-free and able-bodied person for the longest period of time.”
The Big Three
Each exercise is performed in repetitions of 10-second holds with 30 seconds of rest between each set.
Try five repetitions for your first set, three for your second and one for your final set. When you feel like you’re ready for more of a challenge, add one repetition to each set with every exercise.
You can also increase the holding times once you start to build endurance, as long as you don’t experience back pain.
*Those who suffer from chronic back pain or have a pre-existing back condition should have approval from their physician before performing the following exercises.
1. The Curl-Up
Target: Abdominal Muscles a.k.a. Rectus Abdominis and the Obliques
While lying down face up, slide your hands under your lower back with your palms facing down to support the lumbar spine. This position maintains the natural curve of your spine during the exercise, minimizing the stress on your back.
Keeping one leg extended, bring the other into a bent position so that your planted foot lines up with the knee of your extended leg.
Before you begin the hold, stiffen the abdominal muscles and elevate your elbows off the floor with your hands still underneath your lower back. Keeping your torso and neck as immobile as possible, raise your head and shoulders about one centimetre off the floor and hold the position for 10 seconds.
McGill says to imagine your head and shoulders resting on a bathroom scale and that the lift is just enough to make the scale read zero.
To avoid neck pain, be sure to raise your shoulders, neck and head as a unit.
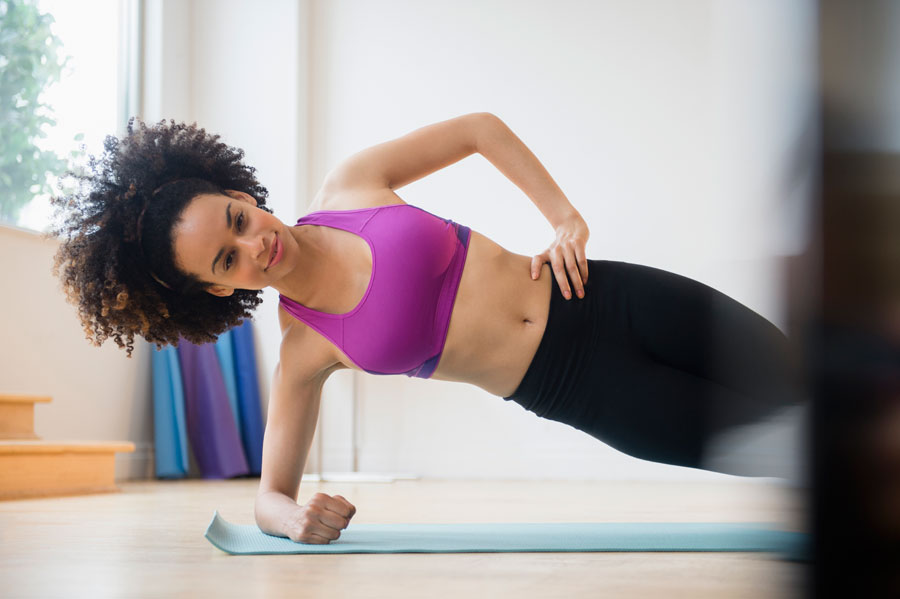
2. The Side Plank
Target: Spine-Stabilizing Muscles, including Quadratus Lumborum, the Abdominal Wall and Latissimus Dorsi
For beginners, start by lying on your side, supporting yourself with your forearm and with knees bent about 90 degrees. Rest your upper hand on the top of the thigh or hip. Raise your hips, keeping your body straight. Hold this position for 10 seconds.
For a more challenging version, straighten your legs, slide the top foot ahead of the bottom one and use only your forearm and feet as contact points.
This exercise can also be moved to the wall if you’re unable to do the floor variations – try leaning sideways against a wall with the forearm perpendicular to your straight body. The farther the feet are away from the wall, the tougher the exercise. Again, hold for 10 seconds.
Don’t forget: do the exercises on both left and right sides!
3. The Bird Dog
Target: The Back and Hip Extensors
Kneel down on all fours with your hands directly under your shoulders and knees under your hips.
Stiffen your abdominal muscles and raise the opposite arm and leg simultaneously. The hold begins when both limbs are parallel to the floor. Don’t raise the arm higher than the shoulder or the leg higher than the hips.
To improve the benefits of the exercise, sweep the upraised hand and knee along the floor in between the holds.
Remember to keep the spine locked. Only the shoulders and hip joints should move during the exercise.
Watch demonstrations of the exercises here
Bonus: The Dead Bug
Target: Hip Flexors
Lie on your back. Place your left hand palm down under your lower back. Bend your right knee and keep the foot on the floor. Your right arm should be on the floor over your head.
Stiffen your abdominal muscles. Moving only about the hip and shoulder, raise your left leg and right arm up to about 45 degrees, then lower them back to the floor.
Repeat using the five, three and one rep set pattern. After completing your 10-second holds, alternate to the opposite arm and leg.
'%3E %3Cg id='Group'%3E %3Cpath id='Vector_2' d='M12.4876 13.8996V13.4213H0.743091V15.2149H9.18805L9.22196 15.2685C9.19653 15.2272 3.24373 25.2836 0.74521 29.5469C0.420975 30.1015 0.0797856 30.7158 0.0797856 30.7158C0.0713089 30.7323 0.0585938 30.755 0.0585938 30.755H12.1401V28.9614H3.67181L3.6379 28.9078C3.37512 29.1222 12.4876 13.8996 12.4876 13.8996ZM36.1229 22.115C36.1229 26.4896 33.7537 29.18 31.1683 29.18C28.5829 29.18 26.1861 26.4896 26.1861 22.115C26.1861 17.7403 28.5553 15.0231 31.1683 15.0231C33.7812 15.0231 36.1229 17.7403 36.1229 22.115ZM22.0155 22.115C22.0155 26.4896 19.6462 29.18 17.0587 29.18C14.4712 29.18 12.0765 26.4896 12.0765 22.115C12.0765 17.7403 14.4458 15.0231 17.0587 15.0231C19.6717 15.0231 22.0155 17.7403 22.0155 22.115ZM38.223 22.0613C38.223 16.7095 35.0443 13.1492 31.1661 13.1492C27.288 13.1492 24.3402 16.4312 24.0987 21.4326C23.8592 16.4333 20.7842 13.1492 17.0587 13.1492C13.3332 13.1492 9.97427 16.7074 9.97427 22.0613C9.97427 27.4153 13.1785 31.0003 17.0587 31.0003C20.9389 31.0003 23.8592 27.7183 24.0987 22.6922C24.3402 27.7162 27.4406 31.0003 31.1661 31.0003C34.8917 31.0003 38.223 27.4421 38.223 22.0613ZM51.3747 30.755H53.5257L52.3178 13.4213H50.1668L45.797 27.3328L41.4273 13.4213H39.2763L38.0662 30.755H40.2172L41.0352 19.0247L44.7205 30.755H46.8714L50.5567 19.0247L51.3747 30.755ZM53.9453 30.755H62.3797V28.9614H56.0963V22.9293H60.964V21.1357H56.0963V15.2128H61.8859V13.4192H53.9453V30.7529V30.755ZM69.3624 18.2021C69.3624 20.1029 68.1333 21.1625 66.7367 21.1625H64.893V15.2128H66.7092C68.1333 15.2128 69.3624 16.3261 69.3624 18.2021ZM71.5134 18.1753C71.5134 15.2128 69.3348 13.4213 67.0164 13.4213H62.7993V30.755H64.893V22.9313H66.7092L71.5112 30.755H73.997L68.8601 22.4695C70.369 21.8717 71.5134 20.3502 71.5134 18.1773' fill='%23231F20'/%3E %3C/g%3E %3C/g%3E %3C/g%3E %3Cg id='Group_2'%3E %3Cpath id='Vector_3' d='M9.67285 8.56629V3.50513H12.6249V4.11535H10.5947V5.71719H12.2943V6.32742H10.5947V7.954H12.9046V8.56423H9.67285V8.56629Z' fill='%23231F20'/%3E %3Cpath id='Vector_4' d='M17.6819 8.6137H17.2581L15.1855 3.50513H16.1392L17.0822 5.86975C17.2178 6.20991 17.362 6.63872 17.4976 7.05103H17.5188C17.6544 6.64696 17.7879 6.2264 17.9341 5.86975L18.8666 3.50513H19.7482L17.6862 8.6137H17.6819Z' fill='%23231F20'/%3E %3Cpath id='Vector_5' d='M22.4072 8.56629V3.50513H25.3593V4.11535H23.3291V5.71719H25.0287V6.32742H23.3291V7.954H25.639V8.56423H22.4072V8.56629Z' fill='%23231F20'/%3E %3Cpath id='Vector_6' d='M31.6164 8.56629L29.9698 6.32123H29.2959V8.56629H28.374V3.50513H30.0948C30.9552 3.50513 31.805 4.01227 31.805 4.90906C31.805 5.54402 31.3896 5.97283 30.8725 6.16249L32.6654 8.56629H31.6185H31.6164ZM29.9592 4.10711H29.2959V5.71719H29.9592C30.436 5.71719 30.8704 5.43888 30.8704 4.90906C30.8704 4.37923 30.436 4.10711 29.9592 4.10711Z' fill='%23231F20'/%3E %3Cpath id='Vector_7' d='M37.5849 6.27382V8.56629H36.6737V6.28206L34.6943 3.50513H35.667L36.6503 4.90081C36.8156 5.13789 37.0021 5.38528 37.1378 5.59968H37.159C37.3031 5.39353 37.5001 5.11522 37.657 4.90081L38.6403 3.50513H39.5621L37.5828 6.27382H37.5849Z' fill='%23231F20'/%3E %3Cpath id='Vector_8' d='M44.3084 4.11535V8.56629H43.376V4.11535H41.7188V3.50513H45.9656V4.11535H44.3084Z' fill='%23231F20'/%3E %3Cpath id='Vector_9' d='M52.0484 8.56629V6.32948H49.499V8.56629H48.5771V3.50513H49.499V5.71926H52.0484V3.50513H52.9808V8.56629H52.0484Z' fill='%23231F20'/%3E %3Cpath id='Vector_10' d='M56.2129 8.56629V3.50513H57.1453V8.56629H56.2129Z' fill='%23231F20'/%3E %3Cpath id='Vector_11' d='M64.7402 8.64463L62.4091 6.17693C62.0467 5.79553 61.6208 5.31106 61.2796 4.91524L61.2584 4.92349C61.2796 5.3523 61.2902 5.7811 61.2902 6.13776V8.56629H60.3789V3.50513H61.0316L63.1868 5.82233C63.4878 6.14806 63.9222 6.63872 64.2337 7.00362L64.2549 6.99537C64.2337 6.62223 64.2231 6.17899 64.2231 5.83677V3.50513H65.1344V8.64669H64.7402V8.64463Z' fill='%23231F20'/%3E %3Cpath id='Vector_12' d='M70.9048 8.64416C69.4235 8.64416 68.0566 7.69172 68.0566 6.03421C68.0566 4.37671 69.4659 3.41602 70.8752 3.41602C71.5999 3.41602 72.17 3.57476 72.5324 3.78091L72.3883 4.42412C72.0471 4.21797 71.5491 4.05098 71.0002 4.05098C69.9639 4.05098 68.9912 4.77253 68.9912 6.04246C68.9912 7.31239 69.9448 8.01745 70.9599 8.01745C71.405 8.01745 71.7567 7.93911 71.975 7.7948V6.61352H70.8349V6.03421H72.8354V8.12877C72.3586 8.47718 71.7271 8.64416 70.9091 8.64416H70.9048Z' fill='%23231F20'/%3E %3C/g%3E %3Cpath id='Vector_13' d='M0.0839844 1.00212L73.997 1' stroke='%23231F20' stroke-width='1.25' stroke-miterlimit='10'/%3E %3Cpath id='Vector_14' d='M0.0839844 10.9116H73.997' stroke='%23231F20' stroke-width='1.25' stroke-miterlimit='10'/%3E %3Cpath id='Vector_15' d='M4.91016 4.15649L3.55812 4.13794L5.18777 5.7068L0 5.6532V6.5974L5.20049 6.651L3.61321 8.18068L4.96526 8.19718L7.0018 6.20157L4.91016 4.15649Z' fill='%23D71920'/%3E %3C/g%3E %3C/svg%3E)
