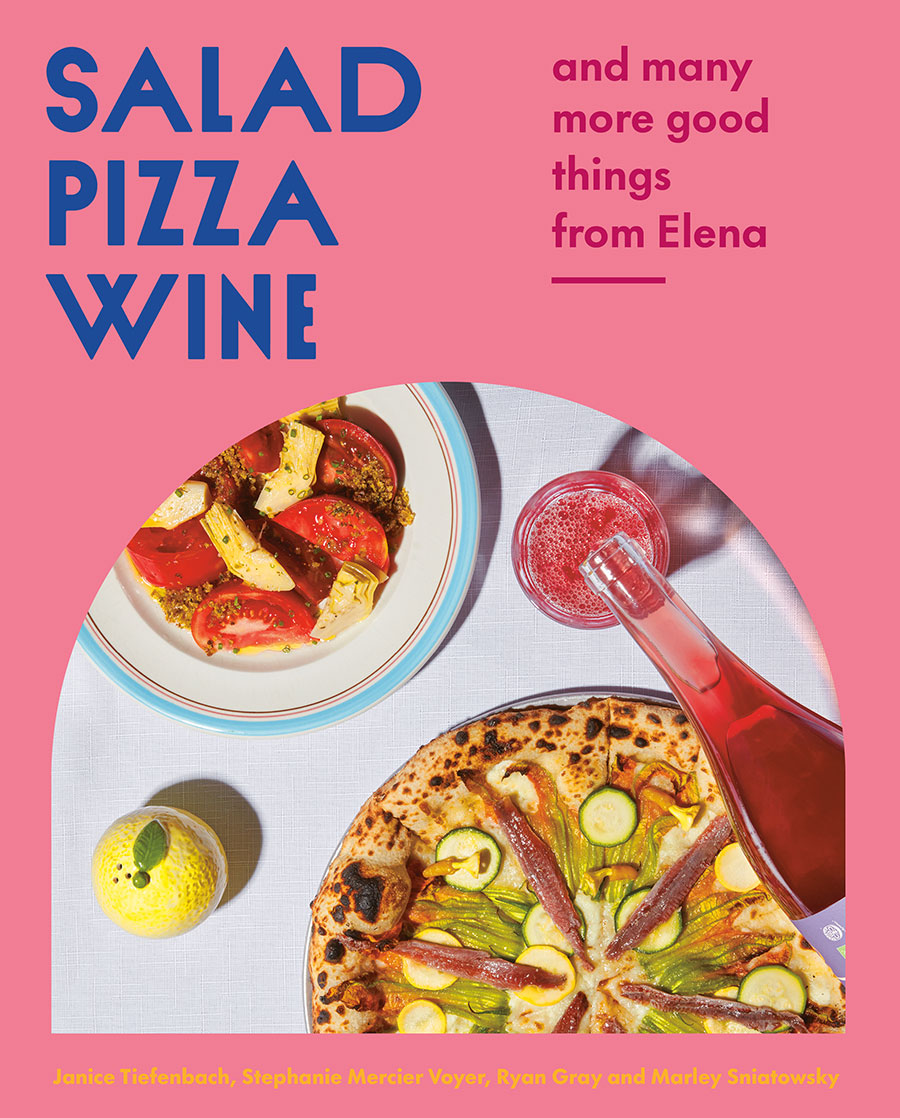
‘Salad Pizza Wine’: Recipes and Insider Chef Tips From Montreal Eatery Elena

All the ingredients come together to trick your brain into thinking you’re eating a delicious caesar salad, but there’s no mayonnaise and no anchovies anywhere in the recipe. Photo: Dominique Lafond
Sometimes only pizza will do. Or maybe pasta. But even more so, when these comfort food faves are paired with a delicious (and healthy!) twist on a classic caesar salad.
Salad Pizza Wine, a new cookbook from the team at popular Montreal pizza joint Elena, features some of the restaurant’s tried and true recipes, as well as new dishes created for the home chef. “The recipes [in the book] are based on many of the menu’s classics guided by the seasons, plus some new recipes created with the home cook in mind,” Janice Tiefenbach, the executive chef of Elena and the co-owner of Italian restaurant Gia Vin & Grill, told Zoomer via email.
“We really wanted to make a book that was fun, personal and with recipes that are super accessible for home cooks,” she adds. The result is a modern, bright and bold Italian cookbook, chock full of 115-plus versatile, mix-and-match recipes.
To bring home a taste of this Montreal eatery, we serve up several recipes from the book, including such crowd-pleasing dishes as Dany Neapolitan Pizza, Tagliatelle with Ragu, Kale Caesar and Roasted Broccoli with Olive and Almond Pesto — but first, some insider culinary tips from chef Tiefenbach. Buon cibo.
Insider Tips: Can you share your fave flavour boosters — and any other secret weapons?
One of my favourite flavour booster hacks is to use leftover parmesan rinds to make stock. People typically just throw away the rinds, but they still hold a tremendous amount of flavour potential. That broth can later be used to boost a sauce, pasta, braise meat or vegetables or just used in a soup instead of water. Besides the parm stock hack, a little acid or sweetness can really make a difference. I like to keep a bit of good-quality wine vinegar and a lemon nearby. Just a pinch of vinegar or even a little lemon zest can really add dimension and brightness. A little drizzle of honey is a subtle way to balance something spicy or bitter and create depth.
Must-Haves: What items/ingredients do you keep stocked in your pantry/fridge?
Things I always have on hand: a block of parm, a few cans of oil-packed tuna, good quality tomatoes, nice olive oil, capers, garlic and anchovies. I like to do small trips to the market, especially in the summer, and just grab things that appeal to me or look super fresh. Having some solid staples at the ready means I can have something delicious ready in under 30 minutes, no matter what. I also love to have little stashes of chicken or parm stock in my freezer that I make ahead of time so that I can use them in a pinch whenever needed. Freezing in small containers or even ice cube tray blocks means you can have them ready to rock in minutes.
Finding Comfort: What is your go-to comfort food dish?
My ultimate comfort food is definitely pasta.
Snack Attack: What is your favourite snack, healthy and otherwise?
I am definitely a snacker! My weakness is sugar, especially cookies. The pistachio cookies featured in the book are always around at the restaurant, and I know I’m not the only one who is guilty of stealing them from time to time.
Multigenerational: Favourite dishes to cook with the kids (or grandkids)?
It’s no secret that kids love to eat pizza, but they also love to make it. There’s something truly magical about putting squishy floppy dough in the oven, and when it comes out, it’s suddenly pizza! It’s a really fun project for the whole family.
This Q&A has been edited for length and clarity
RECIPES
Dany Neapolitan Pizza
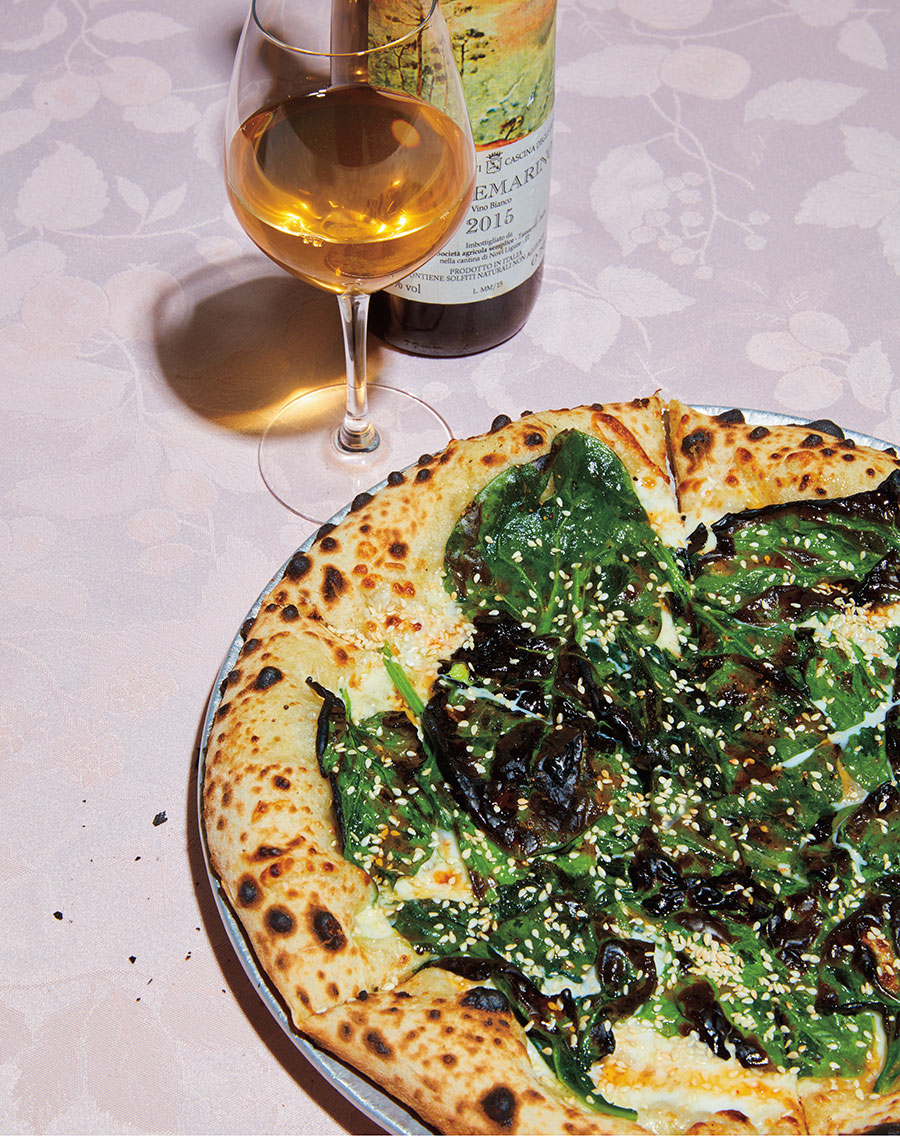
If you grew up or partied in Montreal anytime between 1998 and 2014, there’s a good chance you ended up eating a slice at Pizza Dany on de la Montagne. It was also the place we used to go to after we finished working long nights at Nora Gray. Steph and our friend Nick Rosati (who now co-owns Crèmerie Dalla Rose and Cafè A Posto) would go there all the time on their way back to the Plateau and would joke about getting pulled over for “overeating and driving” as they wolfed down greasy slices of spinach pizza with sesame seeds. Being able to make our version of Dany’s famous spinach pizza is our way to still indulge and reminisce about those years now that our partying days are behind us.
Makes 1 (10 inch) pizza
Ingredients:
1 ball Neapolitan Pizza Dough (recipe below)
1 clove garlic, finely minced
2 tbsp extra virgin olive oil
1 large handful big-leaf spinach (about 1 cup packed)
Kosher salt
Freshly ground black pepper
1 ball (2½ oz/75 g or about ½ cup) buffalo mozzarella
1/3 cup grated low-moisture mozzarella
1 tsp sesame seeds
1 tsp Spicy Honey (recipe below)
Instructions:
Before you can start building your pizza: Follow the instructions in the Stretching and Baking section (p. 73) to position the rack and preheat the oven, temper the dough, set up your pizza station, stretch the dough, and transfer it onto the pizza peel.
Once those steps are complete, you’re ready to build your pizza.
Prepare the toppings: In a medium bowl, whisk together the minced garlic and olive oil. Add the spinach, salt and pepper and toss until the spinach leaves are well coated in garlic oil. Set aside.
Top the pizza: Break the buffalo mozzarella into small pieces with your fingers and disperse it evenly over the pizza, leaving 1½ inches of uncovered dough around the edges for the crust. Add the low-moisture mozzarella in a similar fashion. Place the dressed spinach over the cheese in one even layer and sprinkle the whole pie with sesame seeds.
Bake and rest the pizza: Follow the directions in the Stretching and Baking section (p. 73).
Finish the pizza and serve: Drizzle the cut pizza with spicy honey, close your eyes and imagine it’s 4 a.m. Enjoy!
Sourdough Starter
Making and keeping a sourdough starter can be a pain at first, but it will bring the taste of your pizza dough and bread to the next level. If none of your friends have a sourdough starter at home, making your own is easy if you follow these simple steps.
Ingredients:
All-purpose flour
Warm water
Whole wheat flour, rye flour or flour of your choice (to feed your starter)
Instructions:
Day 1: In a container with a lid (a mason jar or a plastic container work fine), combine ¼ cup all-purpose flour with ½ cup very warm water (86 F–95 F) and mix, making sure to leave a few inches at the top for the starter to expand. Place the container somewhere warm (a turned-off oven with the light on works well).
Day 2: After 24 hours, the mixture should be bubbling and sour, meaning the fermentation process has started. If it hasn’t, wait another 12 hours and check again. Add ¼ cup all-purpose flour and mix to combine. Return the jar to its cozy spot.
Day 3: The starter should now be bubbling more and have gained in volume due to fermentation. Discard all but roughly 2 tbsp of the starter mixture and add ¼ cup flour of your choice and ¼ cup warm water (about 75 F–82 F). This is your daily starter feed.
Happily ever after: The fermentation should be stable after day 3 and your starter should now smell like yogurt and have peaked in volume. To test it, flick 1 tsp starter in a bowl of warm water. If it floats, it’s ready. You can now feed your starter daily with wheat or rye flour, discarding all but roughly 2 tbsp of starter mix and adding your starter feed (¼ cup flour of your choice and ¼ cup warm water). After several feedings, you’ll start to notice your starter rise and fall throughout the day—this is normal.
If you’re baking regularly, your starter should be fed daily, stored in a sealed container and kept between 68 F and 86 F. If you’re not baking regularly, your starter can be stored in the fridge with- out feeding for up to 30 days. When you’re ready to use it again, take it out of the fridge and repeat each step starting from day 3. It should be ready to use the next day. Keep in mind that the more mature a starter is, the more sourness will be exhibited in the final product. A healthy starter will keep for years.
Spicy Honey
The spicy honey we sell at the restaurant is made with honey that’s produced by our friends Anicet Desrochers and Anne- Virginie Schmidt at Les Miels d’Anicet, a magical bee farm just a few hours north of Montreal. They make a few different types of honey throughout the year (and tons of other amazing honey- derived products), with some of the most unique flavor profiles, including a mild and herbaceous spring nectar, a minty-fresh linden summer honey and a rustic buckwheat honey with cara- melized, barnlike aromas. For this recipe, we gently infuse the honey with Espelette peppers at a relatively low heat (never reaching above 105 F) to avoid affecting its natural texture. It feels a bit like making a cup of tea in a way. You obviously don’t have to use Miels d’Anicet to make this, but try to find organic honey from a producer in your area—you’ll taste the difference right away.
Ingredients:
2 tsp ground Espelette pepper or chili of your choice
½ tsp flaky sea salt
1 cup good-quality unpasteurized honey
Make the spicy honey: In a small pot over medium-high heat, bring to a boil enough water to cover an 8 oz (250 ml) jar. In a small bowl, whisk together the ground Espelette pepper, salt and 11/2 tbsp water. In another small pot (not the one with the boiling water), combine the honey and the salty Espelette pepper water. Cook over low heat until the honey is warm and fluid, below 105 F, about 1–2 minutes.
Pack the spicy honey: Pour the warm honey directly into a clean 8 oz (250 ml) mason jar and close it tightly. Take the boiling water off the heat and gently submerge the closed mason jar into the water. Allow it to steep until the water has completely cooled down. The honey will keep in this jar at room temperature for several months.
Kale! Caesar!
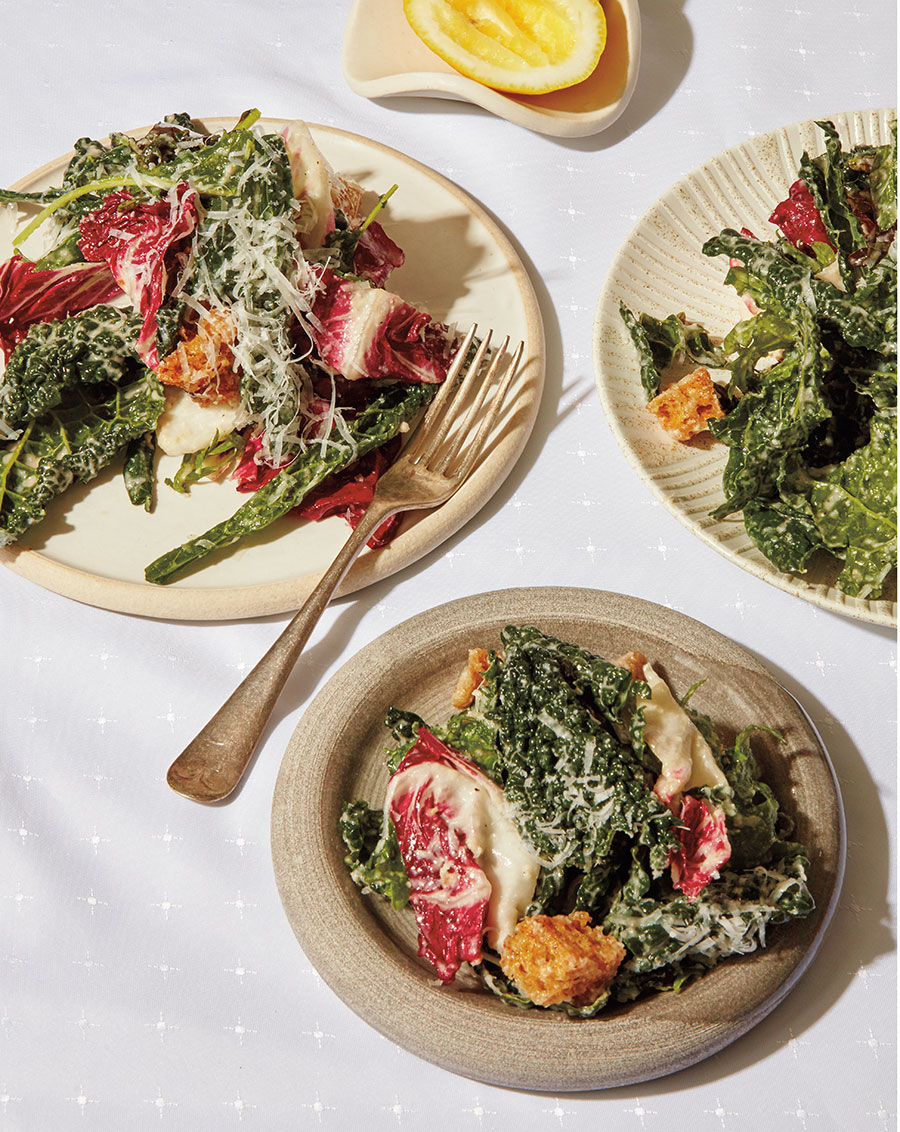
This is the salad equivalent of getting catfished. All the ingredients come together to trick your brain into thinking you’re eating a delicious caesar salad, but there’s no mayonnaise and no anchovies anywhere in the recipe. The only thing it has in common with a caesar are the croutons and the cheese (which we really couldn’t live without). Hail, Caesar!
Serves 4-6
Salad Ingredients:
3 cups Garlic Croutons (p. 252)
1 bunch Tuscan kale, stems removed (about 3 cups when cut into bite-size pieces)
1 head radicchio, shredded (about 5 cups)
1 bunch baby kale, stems removed (about 2 cups)
Juice of 1 lemon
Extra virgin olive oil
Flaky sea salt
Freshly ground black pepper
¾ cup finely grated parmesan
Tahini Caesar dressing ingredients (Makes 2 cups):
12 cloves garlic, divided
3 tbsp + 1/3 cup extra virgin olive oil, divided
1/3 cup tahini
2 tbsp cold water
1/3 cup red wine vinegar
¾ tsp Dijon mustard
¾ tsp kosher salt
2/3 cup canola oil
Freshly ground black pepper
Instructions:
Roast the garlic: Preheat the oven to 350 F. Create a pouch using foil and nestle inside it 10 garlic cloves and 3 tbsp olive oil. Seal up the foil to prevent any oil or steam from escaping. Place the garlic pouch on a baking sheet and roast in the oven until the garlic turns squishy, about 40 minutes. Remove the garlic from the oven but leave the oven on. Open the pouch to let the garlic cool down.
Make the dressing: In a small bowl, whisk together the tahini and cold water until smooth. When the garlic has cooled down a little, add it to a blender along with the tahini mixture, the two remaining raw garlic cloves, vinegar, Dijon and salt. Pulse to combine. With the motor running, gradually add the canola oil (adding it slowly will help emulsify the dressing). Repeat the process with 1/3 cup olive oil. Taste and adjust the seasoning with salt and pepper.
Reheat the garlic croutons: Spread the croutons on a baking sheet and put in the oven to warm up while you make the salad.
Mix the salad: In a large bowl, break the kale into bite-size pieces. Add the radicchio and baby kale and mix with your hands. Add tahini dressing to your liking (you will probably end up with extra dressing, which you can use to make the Chicken Caesar hoagie on p. 219), lemon juice, a generous glug of olive oil, a pinch of salt and a few twists of pepper. Toss to coat evenly. Remove the garlic croutons from the oven and add to the salad along with the grated parmesan. Toss again and serve immediately.
Special Equipment: Blender
Garlic Croutons
Even though this recipe makes about 3 cups of croutons, we highly recommend doubling it right away because you’re going to end up
snacking on half of them before they’re even done cooking (it’s called taste testing, look it up). If you plan on adding the croutons to your salad straight out of the oven, we recommend cooking them three-quarters of the way
through so that they’re crispy on the outside and tender on the inside.
Makes about 3 cups , depending on the size of your loaf
Ingredients:
½ loaf country or sourdough bread (about
11 oz/340 g)
½ cup extra virgin olive oil
½ tsp kosher salt
1 clove garlic
Instructions:
Bake the bread: Preheat the oven to 400 F. Cut the bread into 1-inch-thick slices. Place the slices on a baking sheet in a single layer and douse them with the olive oil until both sides are fairly saturated. Sprinkle both sides with
the salt. Bake for 8–10 minutes, until the bread is just starting to brown, turning each slice halfway through. Remove from the oven and
cool slightly.
Make the croutons: Cut the garlic clove in half and rub it on both sides of each slice of bread to impart a bit of flavor. Cut the slices into 1-inch cubes. The croutons can be made 1 day ahead and stored in an airtight container.
Tagliatelle with Rosemary Sugo
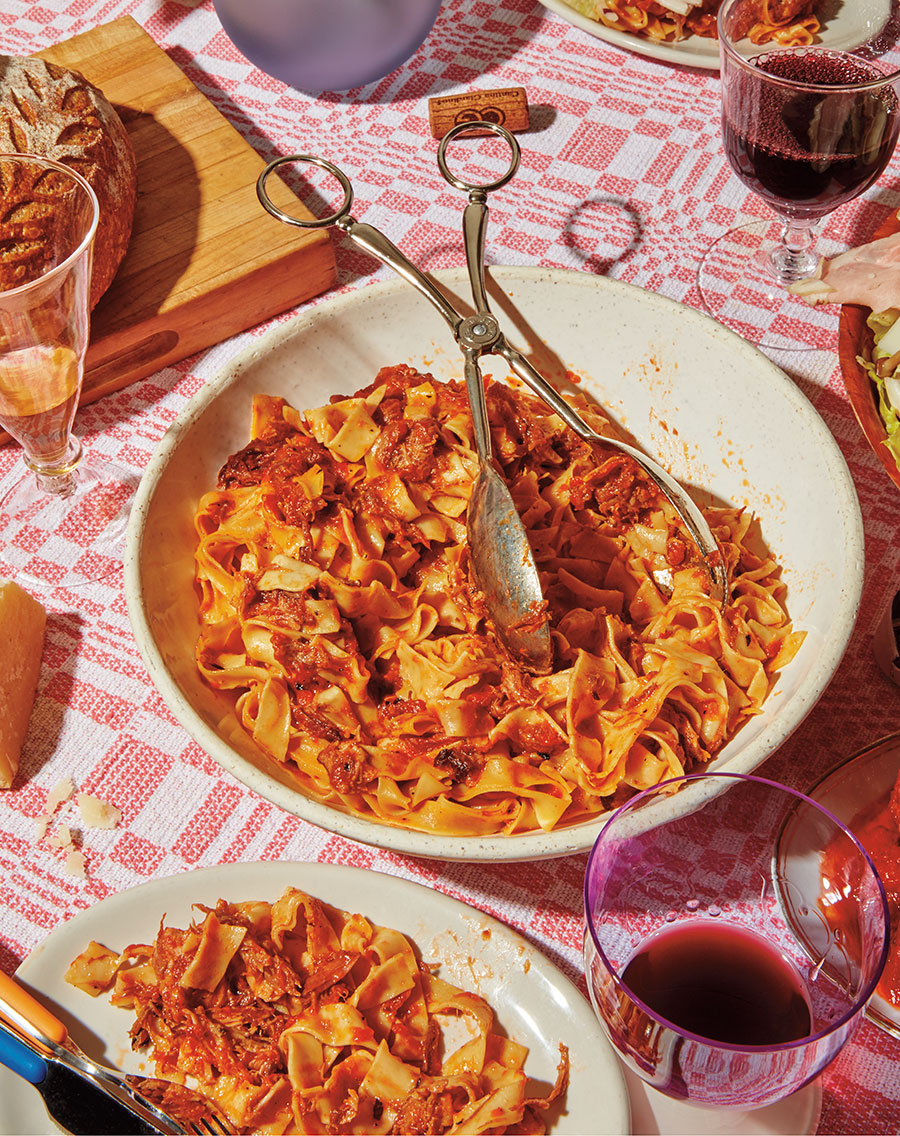
A version of this recipe has been on the menu since day one, and some of the staff (hi, Ellen!) have even threatened to push us down the stairs if we take it off. That is how strongly people feel when you try to take away the most comforting dish they’ve ever had. The ragu is technically a Sunday sauce (a traditional Italian pasta sauce made with all the odd bits of meat you have left at the end of the week). For ours, we braise beef short ribs and pork baby back ribs together with tomatoes, wine and lots of rosemary.
Special Equipment: Food mill or immersion blender
Sugo Ingredients:
1 rack pork baby back ribs, cut into 3 pieces
1 beef short rib
Kosher salt
1/3 cup extra virgin olive oil (or enough to coat the pan)
1 stalk celery, diced 1 large carrot, diced
1 medium onion, diced
½ head garlic, cloves separated
¼ cup tomato paste
1 sprig fresh rosemary
1 bay leaf
1 (28 oz/796 ml) can peeled whole tomatoes
½ cup white wine
2 cups low-sodium chicken stock
Assembly:
1 batch Egg Pasta Dough (recipe below)
Semolina rimacinata, for dusting
1½ tbsp unsalted butter
Kosher salt and freshly ground black pepper
Extra virgin olive oil, to finish
Parmesan, finely grated
Fried sprig fresh rosemary (optional)
Instructions:
Salt the ribs the night before (optional): Place the ribs in a large dish or bowl and sprinkle generously with kosher salt all over. Cover the ribs and store in the fridge overnight. The follow- ing day, uncover the ribs and pat dry.
Sear the ribs: Preheat the oven to 450 F. Lightly grease a large baking sheet with olive oil and line up the ribs on the tray so the meat of the pork ribs and the fat cap of the beef ribs are facing up. Roast the meat for 10–15 minutes until some color develops. Rotate and flip the pieces and continue to oven-sear for a further 10–15 minutes. Remove and let cool slightly.
Make the base: In a Dutch oven or ovenproof pot with a fitted lid, warm the olive oil over medium heat, then stir in the celery, carrots, onions and garlic cloves. Cook, stirring occasionally, until just starting to brown. Add the tomato paste and stir to combine, cooking a further 2 minutes. Add the rosemary sprig, bay leaf, canned tomatoes, white wine and chicken stock and bring to a boil. Once the sugo base has come to a boil, remove from the heat.
Braise the meat: Lower the oven temperature to 275 F. Add the seared ribs to the pot and cover with a lid. Transfer the pot to the oven and cook for 2 hours.
Make the dough: While the meat is braising, follow the instructions for the egg pasta dough below.
Egg Pasta Dough
Thanks to the fat content of the egg yolks and the olive oil, this dough has a richer and suppler texture than semolina dough, making it the ideal choice for more complicated shapes, such as folded and stuffed pasta. This is our master egg dough recipe, but you can play around with it by changing some of the flours to create different flavors and textures.
Serves 4 – 6 ( Makes 1 ¼ lb dough )
Special Equipment: Pasta roller
Ingredients:
5 large egg yolks
1 large egg
1 tsp extra virgin olive oil
2 cups all-purpose flour
1 tbsp water, as needed
Semolina rimacinata, for dusting
Instructions:
Separate the eggs: In a small bowl, crack and separate the eggs (save the egg whites to make the Pistachio Cookies on p. 231 or the Suppli on p. 151), and add the whole egg and 1 tsp olive oil to the five yolks.
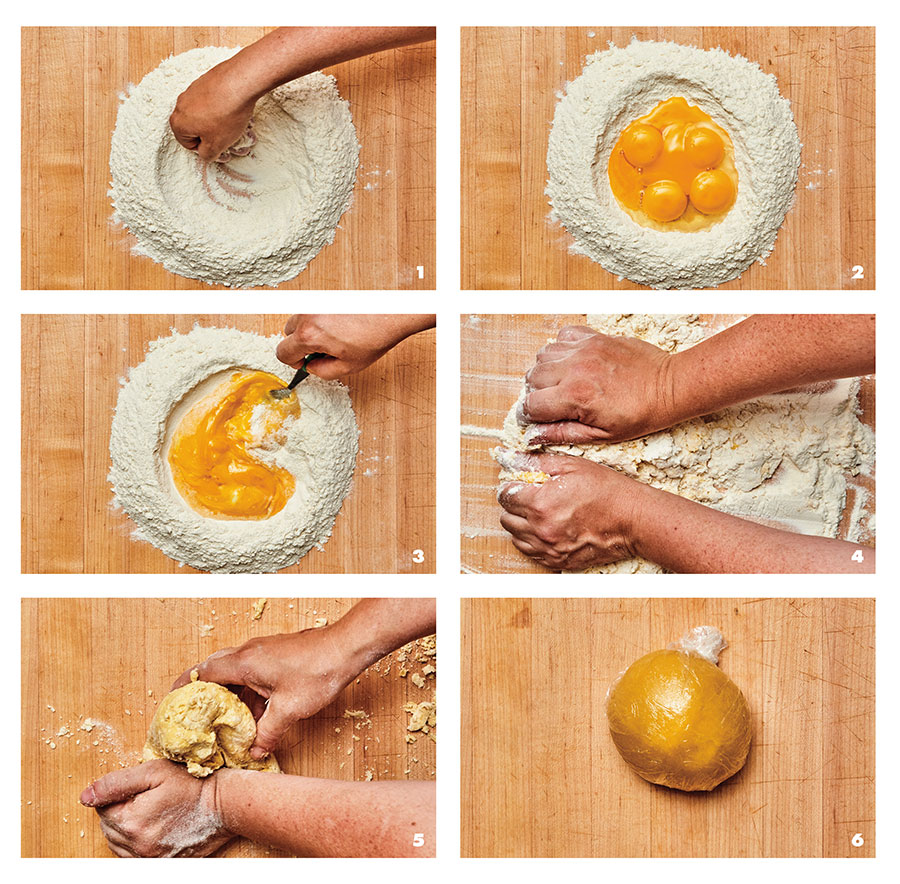
Mix the dough: Pour the flour onto a clean surface. With your hands, carefully shape the flour into a well with a hole large enough to accommodate all the eggs [1]. Place the egg mixture into the flour well [2]. Using a fork, slowly incorporate the flour into the egg mixture, beating gently until it becomes a messy paste [3]. Combine the last bits of flour using your hands [4]. If the dough is too dry, add a bit of water, preferably using a spray bottle or a measuring cup to control the flow.
Once the dough looks ragged, scrape the shaggy bits from your hands with your fingers and use the sticky parts of the dough to pick up leftover bits on the counter, scraping the surface with a butter knife or a bench scraper as you go. Some drier bits might be beyond saving. Simply scrape off and discard.
Knead and rest the dough: Knead the dough by hand [5] until the consistency becomes more or less regular [6], 5–10 minutes. If you get tired, do this in two steps, making sure to cover the dough with a damp towel, food wrap or a bowl flipped upside down to prevent it drying out while you take a break. As the dough rests, the gluten will relax, making it much easier to work with. If you are very strong (or have a friend willing to take a shift), do it all in one go.
Roasted Broccoli with Olive and Almond Pesto
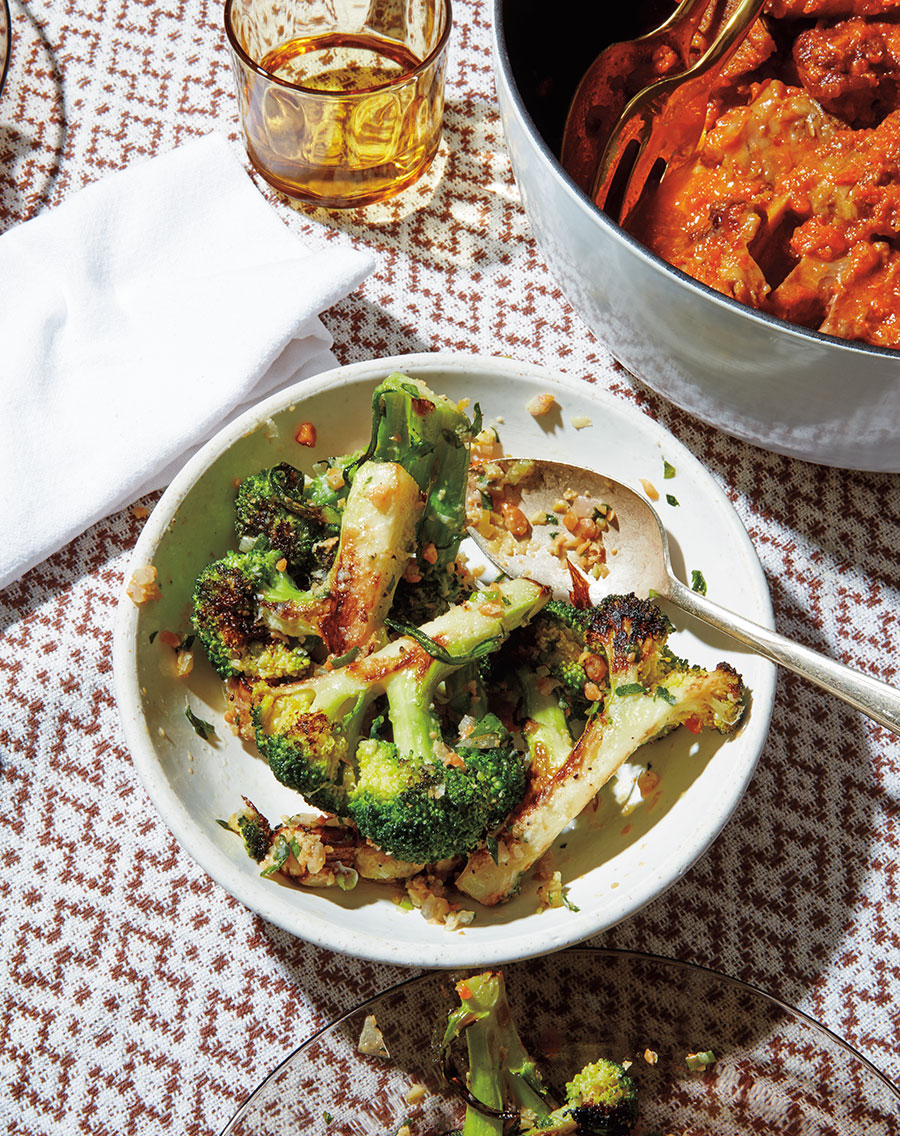
This is the only roast guaranteed to get you praised and not canceled. This recipe makes enough to feed about six people, but we always recommend making a bit more because we’ve been guilty of eating a whole tray of roasted broccoli before it even makes it onto the plate.
Serves 4 – 6
Special Equipment: Food processor
Roasted broccoli ingredients:
2 large heads broccoli (8 cups florets)
¼ cup extra virgin olive oil
Olive and almond pesto ingredients:
¾ cup toasted almonds (recipe below)
1 cup green olives, pitted (12 oz/375 ml jar)
2 cloves garlic
1 shallot, finely diced
3 green onions, finely chopped
½ cup chopped fresh parsley leaves
¾ cup extra virgin olive oil
Assembly:
2 lemons, divided
Flaky sea salt
Freshly ground black pepper
¼ cup shaved parmesan
Extra virgin olive oil, to drizzle
Instructions:
Prepare the broccoli: Preheat the oven to 425 F. Cut each broccoli head into 6–8 large florets. Trim, peel and cut the stems to match the size of the florets.
Roast the broccoli: In a large bowl, toss the broccoli florets and stems with ¼ cup olive oil. Spread the broccoli on a baking sheet in a single layer and roast until it is slightly charred and still has some bite, about 15–20 minutes.
Make the pesto: Meanwhile, place the toasted almonds, olives and garlic cloves in a food processor and pulse until everything is roughly the size of a lentil, about 10 seconds. Transfer to a small bowl and add the shallots, green onions, parsley and ¾ cup olive oil. Toss to combine. You will probably end up with some extra pesto, which will keep in the fridge for up to 1 week and is a great topping for many more roasted vegetables, like cauliflowers, beans and carrots.
Assemble the dish: In a large bowl, toss the warm broccoli with the pesto, the juice of half a lemon, salt and a few twists of pepper. Taste and adjust the seasoning if needed. Transfer to a platter and top with lots of shaved parmesan and a drizzle of olive oil. Serve with a few lemon wedges on the side.
Toasted and Fried Nuts and Seeds
While we like to toast most of our nuts and seeds in the oven, we prefer to pan-fry smaller varieties like pine nuts and sunflower seeds.
It’s easier to gauge the exact moment when they’re done, plus we’re left with delicious nut-infused oil, which can be strained and reused later to give a nutty kick to a vinaigrette. Buy the best quality nuts you can afford in small quantities and store them in the freezer, where they’ll remain fresh longer (nuts are packed with natural oils that can go rancid). Only roast what you’ll need for the recipe (don’t forget to account for snacking) to ensure ultimate freshness.
Toasting method: Preheat the oven to 300 F. Place the nuts or seeds on a baking sheet and toast until the color has changed slightly and you can start smelling the nuttiness. The exact baking time will depend on the type and size of the nuts. (Pistachios will toast quickly, for example, while hazelnuts will require more time.) Taste them to make sure, or cut them to look inside — a good way to tell if they’re ready is if the texture inside is even throughout.
Excerpted from ‘Salad Pizza Wine’ by Janice Tiefenbach, Stephanie Mercier Voyer, Ryan Gray and Marley Sniatowsky. Copyright © 2023 Janice Tiefenbach, Stephanie Mercier Voyer, Ryan Gray, and Marley Sniatowsky. Photographs by Dominique Lafond. Published by Appetite by Random House®, a division of Penguin Random House Canada Limited. Reproduced by arrangement with the Publisher. All rights reserved.
RELATED:
A Taste of Thailand: A Recipe for Grilled Turkey Satay Skewers From Celebrated Chef Nuit Regular
‘Simple Feel Good Food’: Recipes From Bestselling Cookbook Author Jeanine Donofrio
Cooking With a Conscience: 5 Waste-Free Recipes From Cookbook Author Christine Tizzard
'%3E %3Cg id='Group'%3E %3Cpath id='Vector_2' d='M12.4876 13.8996V13.4213H0.743091V15.2149H9.18805L9.22196 15.2685C9.19653 15.2272 3.24373 25.2836 0.74521 29.5469C0.420975 30.1015 0.0797856 30.7158 0.0797856 30.7158C0.0713089 30.7323 0.0585938 30.755 0.0585938 30.755H12.1401V28.9614H3.67181L3.6379 28.9078C3.37512 29.1222 12.4876 13.8996 12.4876 13.8996ZM36.1229 22.115C36.1229 26.4896 33.7537 29.18 31.1683 29.18C28.5829 29.18 26.1861 26.4896 26.1861 22.115C26.1861 17.7403 28.5553 15.0231 31.1683 15.0231C33.7812 15.0231 36.1229 17.7403 36.1229 22.115ZM22.0155 22.115C22.0155 26.4896 19.6462 29.18 17.0587 29.18C14.4712 29.18 12.0765 26.4896 12.0765 22.115C12.0765 17.7403 14.4458 15.0231 17.0587 15.0231C19.6717 15.0231 22.0155 17.7403 22.0155 22.115ZM38.223 22.0613C38.223 16.7095 35.0443 13.1492 31.1661 13.1492C27.288 13.1492 24.3402 16.4312 24.0987 21.4326C23.8592 16.4333 20.7842 13.1492 17.0587 13.1492C13.3332 13.1492 9.97427 16.7074 9.97427 22.0613C9.97427 27.4153 13.1785 31.0003 17.0587 31.0003C20.9389 31.0003 23.8592 27.7183 24.0987 22.6922C24.3402 27.7162 27.4406 31.0003 31.1661 31.0003C34.8917 31.0003 38.223 27.4421 38.223 22.0613ZM51.3747 30.755H53.5257L52.3178 13.4213H50.1668L45.797 27.3328L41.4273 13.4213H39.2763L38.0662 30.755H40.2172L41.0352 19.0247L44.7205 30.755H46.8714L50.5567 19.0247L51.3747 30.755ZM53.9453 30.755H62.3797V28.9614H56.0963V22.9293H60.964V21.1357H56.0963V15.2128H61.8859V13.4192H53.9453V30.7529V30.755ZM69.3624 18.2021C69.3624 20.1029 68.1333 21.1625 66.7367 21.1625H64.893V15.2128H66.7092C68.1333 15.2128 69.3624 16.3261 69.3624 18.2021ZM71.5134 18.1753C71.5134 15.2128 69.3348 13.4213 67.0164 13.4213H62.7993V30.755H64.893V22.9313H66.7092L71.5112 30.755H73.997L68.8601 22.4695C70.369 21.8717 71.5134 20.3502 71.5134 18.1773' fill='%23231F20'/%3E %3C/g%3E %3C/g%3E %3C/g%3E %3Cg id='Group_2'%3E %3Cpath id='Vector_3' d='M9.67285 8.56629V3.50513H12.6249V4.11535H10.5947V5.71719H12.2943V6.32742H10.5947V7.954H12.9046V8.56423H9.67285V8.56629Z' fill='%23231F20'/%3E %3Cpath id='Vector_4' d='M17.6819 8.6137H17.2581L15.1855 3.50513H16.1392L17.0822 5.86975C17.2178 6.20991 17.362 6.63872 17.4976 7.05103H17.5188C17.6544 6.64696 17.7879 6.2264 17.9341 5.86975L18.8666 3.50513H19.7482L17.6862 8.6137H17.6819Z' fill='%23231F20'/%3E %3Cpath id='Vector_5' d='M22.4072 8.56629V3.50513H25.3593V4.11535H23.3291V5.71719H25.0287V6.32742H23.3291V7.954H25.639V8.56423H22.4072V8.56629Z' fill='%23231F20'/%3E %3Cpath id='Vector_6' d='M31.6164 8.56629L29.9698 6.32123H29.2959V8.56629H28.374V3.50513H30.0948C30.9552 3.50513 31.805 4.01227 31.805 4.90906C31.805 5.54402 31.3896 5.97283 30.8725 6.16249L32.6654 8.56629H31.6185H31.6164ZM29.9592 4.10711H29.2959V5.71719H29.9592C30.436 5.71719 30.8704 5.43888 30.8704 4.90906C30.8704 4.37923 30.436 4.10711 29.9592 4.10711Z' fill='%23231F20'/%3E %3Cpath id='Vector_7' d='M37.5849 6.27382V8.56629H36.6737V6.28206L34.6943 3.50513H35.667L36.6503 4.90081C36.8156 5.13789 37.0021 5.38528 37.1378 5.59968H37.159C37.3031 5.39353 37.5001 5.11522 37.657 4.90081L38.6403 3.50513H39.5621L37.5828 6.27382H37.5849Z' fill='%23231F20'/%3E %3Cpath id='Vector_8' d='M44.3084 4.11535V8.56629H43.376V4.11535H41.7188V3.50513H45.9656V4.11535H44.3084Z' fill='%23231F20'/%3E %3Cpath id='Vector_9' d='M52.0484 8.56629V6.32948H49.499V8.56629H48.5771V3.50513H49.499V5.71926H52.0484V3.50513H52.9808V8.56629H52.0484Z' fill='%23231F20'/%3E %3Cpath id='Vector_10' d='M56.2129 8.56629V3.50513H57.1453V8.56629H56.2129Z' fill='%23231F20'/%3E %3Cpath id='Vector_11' d='M64.7402 8.64463L62.4091 6.17693C62.0467 5.79553 61.6208 5.31106 61.2796 4.91524L61.2584 4.92349C61.2796 5.3523 61.2902 5.7811 61.2902 6.13776V8.56629H60.3789V3.50513H61.0316L63.1868 5.82233C63.4878 6.14806 63.9222 6.63872 64.2337 7.00362L64.2549 6.99537C64.2337 6.62223 64.2231 6.17899 64.2231 5.83677V3.50513H65.1344V8.64669H64.7402V8.64463Z' fill='%23231F20'/%3E %3Cpath id='Vector_12' d='M70.9048 8.64416C69.4235 8.64416 68.0566 7.69172 68.0566 6.03421C68.0566 4.37671 69.4659 3.41602 70.8752 3.41602C71.5999 3.41602 72.17 3.57476 72.5324 3.78091L72.3883 4.42412C72.0471 4.21797 71.5491 4.05098 71.0002 4.05098C69.9639 4.05098 68.9912 4.77253 68.9912 6.04246C68.9912 7.31239 69.9448 8.01745 70.9599 8.01745C71.405 8.01745 71.7567 7.93911 71.975 7.7948V6.61352H70.8349V6.03421H72.8354V8.12877C72.3586 8.47718 71.7271 8.64416 70.9091 8.64416H70.9048Z' fill='%23231F20'/%3E %3C/g%3E %3Cpath id='Vector_13' d='M0.0839844 1.00212L73.997 1' stroke='%23231F20' stroke-width='1.25' stroke-miterlimit='10'/%3E %3Cpath id='Vector_14' d='M0.0839844 10.9116H73.997' stroke='%23231F20' stroke-width='1.25' stroke-miterlimit='10'/%3E %3Cpath id='Vector_15' d='M4.91016 4.15649L3.55812 4.13794L5.18777 5.7068L0 5.6532V6.5974L5.20049 6.651L3.61321 8.18068L4.96526 8.19718L7.0018 6.20157L4.91016 4.15649Z' fill='%23D71920'/%3E %3C/g%3E %3C/svg%3E)
